One of the best things about using a windows operating system is its simple UI, but things get frustrating when you face some errors about which you don’t do anything at all. One of those issues which many users complained of facing is reboot and select the proper device. Many people who are getting this error, might not know what they are dealing with but don’t worry it just means your computer is not able to recognise the windows operating system, which is causing this error.
What Is Reboot And Select Proper Boot Device?
When the computer’s BIOS (Basic input/output program) is having some trouble to find the bootable device or drive, then you see windows reboot and select proper device error. BIOS is the chip in your computer motherboard which helps to start the computer, but because of some error, it’s not able to recognise the windows operating system which is causing this error.
How To Fix Reboot And Select Proper Boot Device Error
While there could be problems with solid state drive (SSD) or Hard Disk drive (HDD), or the window operating system stored in your computer got corrupted because of which you are facing this problem. There are still some ways through which you can resolve this issue without facing any more headache. Here are some effectives ways through which we can solve this problem, check it one by one.
- Fixing Problems On OS Drive.
- Use Of Diskpart.
- Replace CMOS Battery.
- Disable Legacy Mode In UEFI.
- Use Third Party Softwares.
Method 1:- Fixing Problems On OS Drive
In order to fix the error reboot and select the proper device, the first thing which you need to make sure is your computer’s boot order list gives the hard disk the first priority, and if does then follow these steps.
- Restart the computer.
- To open the BIOS menu, press the necessary key options. These options could vary from system to system, but you can use Esc, del, F2, F8, F10, F12 or etc. If the screen is showing you multiple keys, then find the key to open “BIOS menu” or “setup”, “BIOS”.
- Now Go to the Boot tab.
- Here change the boot and list HDD first.
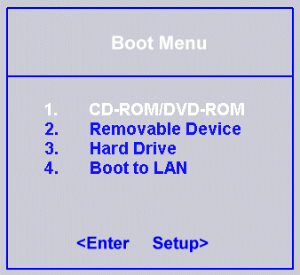
- Save it and restart your computer
Method 2:- Use Of Diskpart
As mentioned above, if the computer’s active drive is not set to be the primary drive, that can also cause reboot and select proper boot device in windows 10. In such cases, what you have to do is configure the active drive to be the primary hard, and here is how you can do it.
- Insert Windows Installation Disc or the recovery media into the computer.
- Now restart the computer and boot it from the inserted media.
- In Windows Recovery Option windows, select “troubleshoot.”
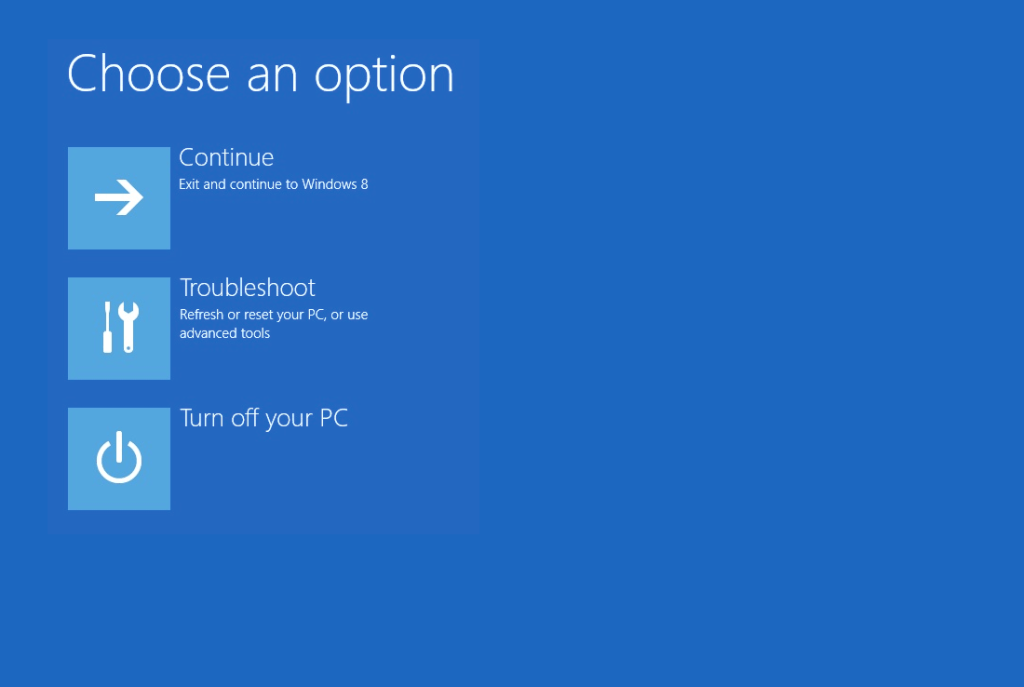
- Then under troubleshoot option, click on “advanced options.”
- Now type the command prompt “diskpart” (without quotes)
- Hit the Enter.
- Then type “select disk 0” (without quote). Here 0 indicates the disk number where windows OS is installed. If you want to know the full list of disks, then type “list disk” (no quotes) and press enter.
- Then type “list partition” and press enter.
- Type “select partition 1” where 1 is the primary partition.

- Type “active” and press the enter.
Method 3:- Replace CMOS Battery
The motherboard’s CMOS battery could also be the reason behind the issue you are facing; in such cases, you have to open the computer cas, go to the motherboard, and remove the CMOS battery. Don’t forget to get rid of the residual charge by holding power for like ten seconds. Then replace the old CMOS battery with a new one, and check whether this fixes reboot and select proper boot device windows 7/ windows 10.
Method 4:- Disable Legacy Boot In UEFI
Some old computers have UEFI instead of BIOS; in this case, if the option named legacy boot is enabled, then this could also become the primary reason behind this issue. In such a case, what you have to do is to disable legacy boot, and you can do that by following simple yet effective ways.
- Restart the computer.
- Now open the UEFI menu by pressing the necessary keys. Again the common keys you can use are DEl, F2, F8, F12, etc.
- Then switch off the legacy option. Depending upon the computer model you are using, you can find it at Security tab> Legacy support.
- Save the settings made and exit.
- Restart the computer.
Now check whether this solution fixes the error you were facing, because sometimes those computers that have UEFI, this fix solves the problem entirely.
Method 5:- Use Third Party Softwares
If the methods mentioned above don’t work for you, you can opt for third-party softwares that will troubleshoot the problem you are facing. However, while selecting such software, ensure its authenticity and good enough, especially asked to pay for the money.
Otherwise, it’s better to tackle the system to a professional technician if you cannot fix this issue even after trying every method by yourself.
Read Also:- How To Get Rid Of Watermark In Winodws
Conclusion-
The solutions mentioned above should fix the problem you are facing, and if you don’t, then try to contact the service center and get the required help from professionals. Sometimes the problem could be with your computer’s hardware; in such case, you will have first to check which part of the computer is preventing you from accessing the Windows OS if the operating system is corrupted. You will have to replace it with a new one since nothing can fix it.
So apply these solutions according to the situation you are in, and if you have any doubt teh try to leave a comment below, we will be happy to help you out.
Thanks for reading the article
Have a nice day 🙂
Check Out The Video Tutorial Also:- https://www.youtube.com/watch?v=VHSZoOzM7DM

Venkatesh Joshi is an enthusiastic writer with a keen interest in activation, business, and tech-related issues. With a passion for uncovering the latest trends and developments in these fields, he possesses a deep understanding of the intricacies surrounding them. Venkatesh’s writings demonstrate his ability to articulate complex concepts in a concise and engaging manner, making them accessible to a wide range of readers.